Enabling Multi-Factor Authentication for a Microsoft 365 account
If you’d like to dramatically improve the security on your Microsoft 365 account, you can enable Multi-Factor Authentication. This method adds an additional layer of security by requiring one extra step to authenticate your account. This article will go over the process of setting up Multi-Factor Authentication for the first time on your account once it’s been enabled. To enable this authentication method, you can ask your Microsoft 365 account administrator to enable it, or you can visit this link here and log in to your account while following the prompts.
If your account has been flagged to set up multi-factor authentication by your Microsoft 365 account administrator, then you’ll automatically be prompted set it up the next time you log in to your account.
- You should be prompted to provide more information upon logging in – click Next
- Select the authentication method you’d like to use, there are usually two options (this depends on how your organization is configured); Mobile app or Authentication phone
- For Mobile app method: Select either Receive notifications for verification or Use verification code. Click Set up once you’ve made a selection
- To use the mobile app method, you’ll need to download the Microsoft Authenticator app on your mobile device first (click the link for information on where to get the app based on your device.) Once you have the app installed you can open it and choose to add an account to it
- When adding an account in the mobile app you should be given the option to scan a QR code. Scan the QR code presented on the webpage now, or alternatively enter the code manually
- Once you’ve added the account to the mobile app, click Next
- It will take a moment but the page will verify you’ve added the account properly, when it’s completed you should see a message “Mobile app has been configured for notifications and verification codes.” Click the Next button
- The next page will send a notification to your phone, you’ll need to respond on your mobile device and choose to Approve the request. Once you’ve completed that, you can click Next on the webpage
- Finally you’ll need to provide a backup method in the event you lose access to the mobile app. Provide a phone number where you could be reached at then click Next
- For Authentication phone method: provide your mobile phone number, then select a Method; depending on how your organization is configured you may see multiple methods available or just one. When you’ve selected a method, click the Next button
- You will receive a text message with a number in it, enter the number received into the field on the webpage then click Verify to proceed. It should confirm the code is correct, click Done
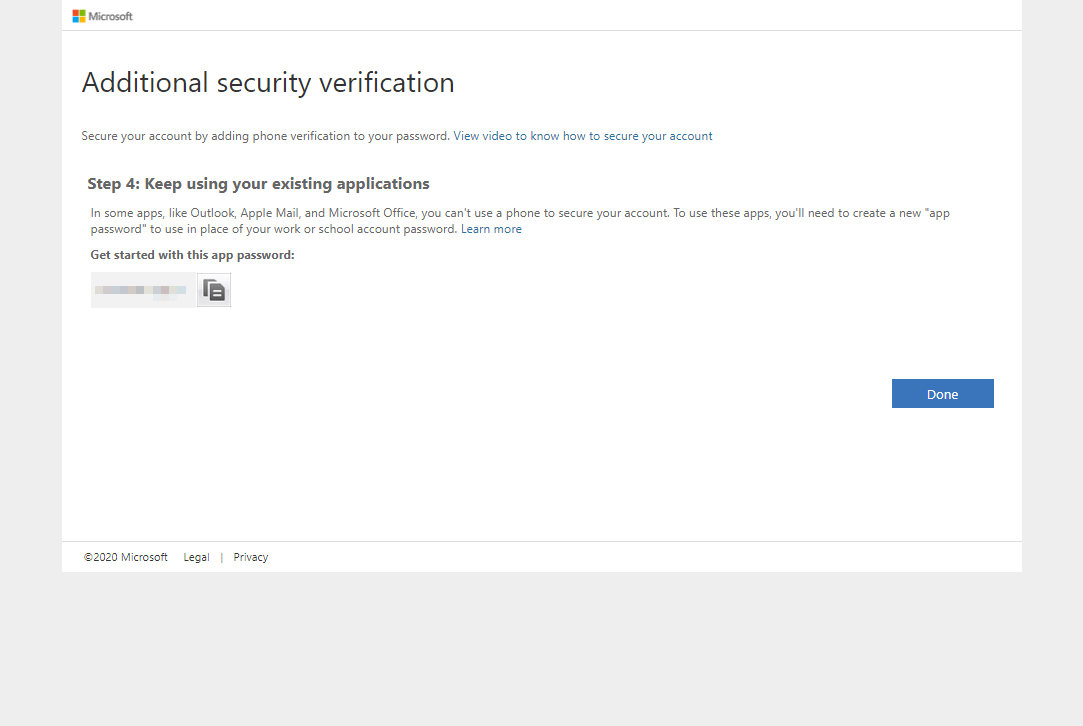
- The final page will display an app password – unless you are using certain special 3rd party applications you should not need to use this password anywhere (see our article on creating app passwords here). Click Done to finish the setup
- Now when you attempt to log in to your Microsoft 365 account, you’ll receive an additional prompt to verify the login to your account – either via SMS code or through the mobile app depending on what you configured
That should cover the basics of getting Multi-Factor Authentication set up for your Microsoft 365 account.
Setting up MFA to use the Mobile App method (Gallery)

Initial prompt for MFA

Mobile app method setup

Mobile app setup QR code

Mobile app set up verification

Mobile app notification verification

Mobile app backup method setup
MFA set up completed

MFA mobile app sign-in method
Setting up MFA to use the Mobile Phone method (Gallery)
Initial prompt for MFA

Mobile phone method setup

Mobile phone verification code prompt

Mobile phone verification code completion
MFA set up completed

MFA mobile phone sms sign-in method
Adding an account to the Microsoft Authenticator app (Android screenshots – Gallery)

Adding an account in the Authenticator app

Choosing the account type

Scanning the QR code

The newly added account

Viewing the account in the Authenticator app
Did we miss something?
or do you want to suggest an article?
