If you use Office 365 for your email, you can keep yourself organized by setting up rules to automatically organize and manage your emails. In this article we’ll go through setting up some basic rules, once you know how it works you can expand and use more advanced rules to better manage your email to help you stay organized.
Setting up rules
First, navigate to outlook.office.com and sign in to your account. Once you’re logged in you should be shown your Inbox by default. Look up in the top right of the page for a gear icon and click on it (sometimes it takes a moment to appear). A new pane should expand on the right side of the page, look down the list for the section Your app settings. In that section click on the Mail link.

The gear icon

The Mail link
The Mail settings page should appear, look on the left of the page for a list of items. Under the Mail section locate Inbox and sweep rules and click on it. The Inbox and sweep rules page should load, you’ll see at the top the title Inbox rules, look for the + icon and click on it to begin creating a new rule.
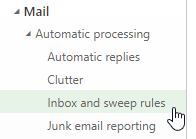
Inbox and sweep rules

Adding a new rule
You should see the New inbox rule pane now. For our example we’ll name the rule Example Rule. After you enter the name click the Select one… drop-down menu under When the message arrives, and it matches all of these conditions. In the menu select It was sent or received > Received from… which will open an email selection pane. For this example we’ll enter our own email address in the It was received from… field. Make sure to press enter on the keyboard if you’re manually typing in the name, alternatively you can click the + button beside a contact name from the list under Your contacts to add the email. Once you have the email / contact added click the Save button near the top left of the page. Next, click the Select one… drop-down menu under Do all of the following. In the menu select Mark the message > as read. Click OK in the top left of the page to save the rule.

Adding an email address to a rule
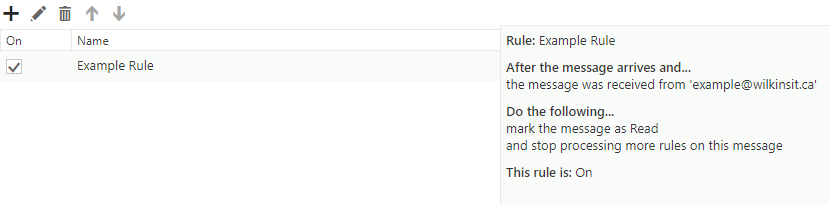
Viewing a created rule
You should now be looking at the Inbox and sweep rules page once again, with your new rule appearing under the Inbox rules section. By default a newly created rule is active immediately, if you need to disable a rule without deleting it just un-check the box under the On column for the rule you want to disable then click Save in the top left of the page. A disabled rule will not run it’s actions even if a message is received that otherwise matches the rules conditions.
You can return to your regular Inbox by clicking the Options link in the top left of the page (just above the list that has Shortcuts at the top). Now if you set up the rule the same as we did in this article, you can test it by sending an email to yourself from your Office 365 account. If it’s working properly you will receive the message and see that the message is immediately marked as read instead of waiting for you to view it to be marked as such.
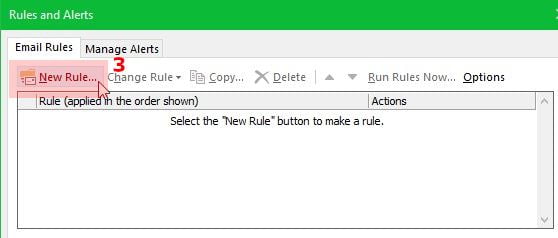
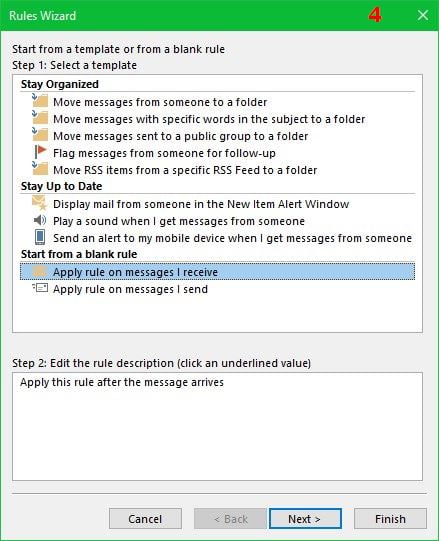
With Office 365 these rules are applied regardless of the device you’re using to view your emails, so everything will be consistent. It is also possible to configure rules through the Outlook desktop app, you can view the gallery below for a guide on how to do that.
Configuring rules in the Outlook desktop app (Image Gallery)


Summary
Rules are a very powerful tool you can use to better keep yourself organized, especially if you are a heavy user of email for communications. Feel free to explore what other options are available for rules to set up specific conditions to manage your emails in a way that works best for you. If we missed anything or you’d like more information about this feature, don’t hesitate to contact us!
