This article will explain how to share calendars from Outlook using Office 365 to others within your organization. There are 2 different methods which depend on whether you use Outlook on the web or the Outlook desktop app, you can find instructions for both here.
Outlook Desktop Application
Open the Calendar Pane by clicking the calendar button in the bottom left of Outlook or use the hotkey (Ctrl+2). Next find the calendar you want to share then right-click it and click Sharing Permissions…
A window should open to the Permissions tab. From here you can add individuals whom you’d like to have access to your calendar by clicking the Add… button. You can also set permissions for your everyone in your organization to your calendar depending on your needs. Once you’ve set the permissions how you’d like you can click the OK button along the bottom of the window to save the changes.
Now in order for the intended users to be able to view your calendar using their own Outlook desktop app, they will need to use the Add Calendar option. This is also found in Outlook calendar pane, along the top ribbon. The should click Add Calendar > From Address Book… then choose the persons calendar they would like access to. After selecting the person and clicking the OK button in the bottom right they should see the calendar listed along the lower left side of the Calendar pane in Outlook, just make sure to tick the checkbox to view it.
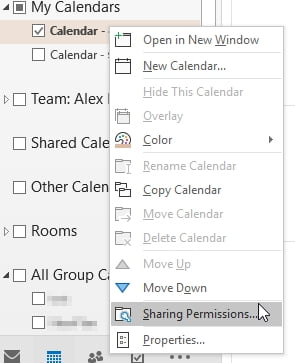
Shared Calendars – 01
Accessing calendar permissions

Shared Calendars – 02
Editing calendar permissions

Shared Calendars – 03
Adding a calendar that you have permission to

Shared Calendars – 04
The newly added calendar in the list
That should be everything, just remember if you want to revoke or otherwise modify permissions to right-click on the calendar and go back to Sharing Permissions… to do so!
Outlook on the web
Log into Outlook on the web if you haven’t already. Once logged in open the calendar pane by clicking the little calendar icon in the bottom left of the window (beside the mail icon). Locate the calendar you’ll be sharing, right-click it and click Sharing permissions.
A new pane should slide out from the right side of the window. Enter in the person(s) you wish to share the calendar with in the appropriate field. For each person you can modify their level of access to the calendar through the drop-down menu beside the Share button. When you’re done click the Share button and the recipients will be sent an email that allows them to add your calendar to their user account.

Shared Calendars – 05
Accessing the calendar pane

Shared Calendars – 08
Sharing a calendar to someone else

Shared Calendars – 09
The email to accept the shared calendar

Shared Calendars – 07
Viewing the newly shared calendar in the list
That’s everything! If you need to remove permissions you can always right-click on the calendar then click Sharing permissions to modify or remove a users access.
