If you have administrator access to your Office 365 organization, you can create and manage your users as you need – this includes creating and deleting users, resetting passwords and assigning licenses. This can be handy for employees joining or leaving the organization and is a relatively straightforward process. This article will guide you through the steps to achieve this.
Getting started
First, if you haven’t already you should sign in and access the Office 365 Admin Portal
Once you’re signed in and viewing the portal you should see several sections on the left. Click on Users > Active Users
You should see all of the active users within your Office 365 organization now. Depending on what you need to do, follow the instructions below to achieve your goal.
Create a new user
To create a new user start by clicking the + Add a user button found along the top left of the users table.

The Add a user button
The new user pane will appear, fill in the information for the user in the appropriate fields. The only required fields are the Display Name and User Name fields.
You can expand the sub-sections by clicking on them if you’d like to fill in detailed information for each section.
Take special note of the Password section, by default it is set to Auto-generate password and Make this user change their password when they first sign in. You can manually set the password by selecting Let me create the password and you can also disable the option for forcing a password reset after logging in for the first time if you prefer.
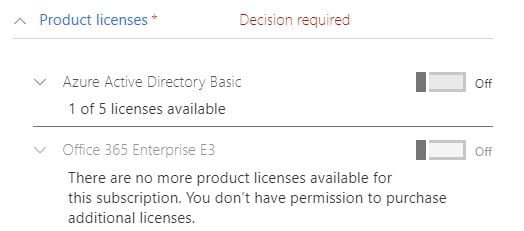
The last requirement before creating a user is under the Product licenses section. Select the appropriate license for that user by clicking the switch icon and setting it to On. If you are not ready to set a license for the user or you need to wait until a new license is provisioned you can select the Create user without product license option – this will allow you to create the user but they will not have the ability to use Office 365 services until a license is assigned.
You can go through and configure any other fields however you see fit, though once you are finished click the Add button below the Product licenses section to save and create the new user. After a moment you will see a new window confirming the user was added, if you prefer you can email the password to anyone that may need it by enabling the Send password in email option and entering a valid email address in the field, if you need to send the password to multiple addresses separate the emails with a semicolon. If you assigned the user a license then the user will be active immediately and can use any services tied to that license!

The add a user confirmation
Note: if you require additional licenses for new users and you have signed up for Office 365 through Wilkins IT you will have to contact us to provision a new license – the process only takes a few minutes in most cases.
Remove a user
We do not recommend outright deleting user accounts in Office 365, in most cases it is better to simply de-license a user as this retains any data that may be in the users account should the organization need access to it. In some cases though it may be necessary to actually delete a user account, for example if you created an account that never ended up being used – in this case follow these steps to do so.
Locate the user account under Active Users that you wish to delete and click on it.
The user information pane will appear, near the top look for the Delete user button and click it.

The Delete user button
You will see a warning about deleting the user, if you’re sure click the Delete button to confirm and actually delete the user account.
After a moment you will see a confirmation that the user was deleted, click the Close button to finish.
User license management
Sometimes you may encounter a situation where you need to make changes to a users license. For example if you have one employee leaving and a new user joining the organization. In situations like this, you can simply swap an active license from one user to another. You can also use the instructions to simply revoke a license from a user and keep it free until it is ready to be used again in the future.
Locate the user you want to remove under Active users and click on their name.
The user info pane will appear, locate the section for Product licenses and click the Edit link to the right of that section to make changes.
To remove an active license locate it in the list and change the switch for it from On to Off by clicking it.
Assigning product licenses to a user
When you’ve removed the licenses be sure to click the Save button along the bottom to apply the change.
You should now have a free license to use however you would like. If you need to attach it to another user continue reading below, otherwise you should be finished for now.
To attach the license to another user the process is very similar, locate the user under Active users and click on them. Then click the Edit link for the Product licenses section. Find the license in the list and click on the switch for it so it changes to On.

The Product licenses section
When you’ve set that license just make sure to click the Save button at the bottom to apply those changes.
You can remove and add licenses however often you need. There are no limits to how long a user must have a license before it can be removed or anything like that. So you can make changes as your organization’s needs change.
Note: if you require additional licenses for new users and you have signed up for Office 365 through Wilkins IT you will have to contact us to provision a new license – the process only takes a few minutes in most cases.
Reset a user password
Sometimes you may need to reset a password for a user or maybe you need to prevent a user from logging into their account for some reason. Whatever your reasons, you can follow these steps to reset a password for any user in your Office 365 organization.
Locate the user you need to reset the password for in the list under Active users and click on their name.
The user info pane should appear, look for the Reset password button near the top of the page and click on it.

The Reset password button
You will be given two options for resetting the password, choose whichever you’d like as well as setting the option for forcing the user to change their password after logging in again to your preference. Click Reset to update the password.
After a moment, the password will update and you’ll see a confirmation. You can also opt to send the new password in an email if you prefer. When you’re finished click either Send email and close or Close.
That’s everything, the user should be able to log in using the new password now!
