Connecting your Wilkins IT email to your Gmail or Outlook.com account
If you have your own custom domain and email service provided through WilkinsIT you may find managing multiple addresses to be cumbersome or tedious. Or you may find that having to go visit different websites to simply access and manage email to be less efficient for you. Many people are already familiar with the interface and prefer to use Gmail or Outlook.com online – these service both have an option to connect external email accounts which can simplify how you interact with your emails.
This article will cover connecting your WilkinsIT email account to each of these services and the various settings that can be used with each. Please note that sending emails with your WilkinsIT email is only supported through the web interface on both of these services, if you’re using a desktop/mobile app it is better to simply connect your WilkinsIT email directly (please refer to this article for instructions on this method).
Connecting the account in Gmail
- Log in to your Gmail account then click the Gear icon found in the top-right area of the page and click See all settings
- Click on Accounts and Import, the beside the Check email from other accounts: click Add an email account
- Enter the Email address for your WilkinsIT email and click Next
- If you’re provided an option to use Gmailify or importing the emails, choose Import emails from my other account (POP3) and click Next
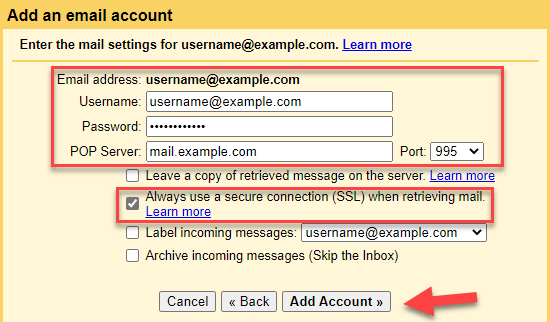
- You’ll be required to fill in some information;
- Username should be the same as your email address
- Enter your email password for the WilkinsIT account
- POP Server will usually be the mail subdomain for your domain (e.g. if your domain is example.com it may be mail.example.com)
- Port should be 995
- Tick the box for Always use a secure connection (SSL) when retrieving mail
- There are several other options you can use but are optionally configured however you prefer
- After entering the settings and clicking Add Account you should see a confirmation screen that your account has been added. If you don’t then double check the information you entered is accurate and correct.
- You will be asked if you want to be able to send mail with this account as well now. If you would like to configure this option select Yes I want to be able to send mail as (email address) and click Next, otherwise you can finish by selecting No and click Next and you can disregard the remaining instructions.
- Enter the Name you want to appear when sending email as this address and tick the box for Treat as an alias then click Next Step
- You’ll need to fill in some information next;
- SMTP Server will usually be the mail subdomain for your domain (e.g. if your domain is example.com it may be mail.example.com)
- Port should be 465
- Username should be the same as your WilkinsIT email address
- Enter the password for your WilkinsIT email account
- Select Secured connection, using SSL (recommended)
- Click Add Account once you’ve entered the information
- Finally, you’ll need to verify the email address. You’ll receive an email to your WilkinsIT email, locate it and either click the link inside it or enter the code inside it on this confirmation screen and click Verify
- You should now see your WilkinsIT email configured under Accounts and Import inside the settings and optionally you’ll see it listed under Send mail as, you can configure it to be your default send address too if you prefer
Your Gmail account will regularly retreive email from your WilkinsIT email and if you configured the send option you’ll also be able to send email so it’s also using your WilkinsIT email address.

Connect Gmail – Step 1

Connect Gmail – Step 2

Connect Gmail – Step 3

Connect Gmail – Step 4
Connect Gmail – Step 5

Connect Gmail – Step 6

Connect Gmail – Step 7

Connect Gmail – Step 8

Connect Gmail – Step 9

Connect Gmail – Step 10

Connect Gmail – Step 11
Connecting the account on Outlook.com
Please note that officially, Microsoft have discontinued this feature of Outlook.com. We have left the original instructions here for posterity though they’re no longer valid.
- Log in to your Outlook.com account then click on the Gear icon found in the top-right of the page
- Look towards the bottom of the Settings pane and click on View all Outlook settings
- In the main Settings window click on Mail then click Sync email
- Under Connected accounts find the Add a connected account section then click on Other email accounts
- You’ll need to fill out some information next;
- Display name is usually your first & last name
- Enter your WilkinsIT email address in the Email address field
- Enter your WilkinsIT email password in the Password field
- Under You can choose where the imported email will be stored we recommend using the Create a new folder for imported email, with subfolders like the account you’re connecting. However if you prefer another organization method you can select that instead
- Tick the box under Advanced settings for Manually configure account settings (POP, IMAP, or send-only account) then click OK
- Several new fields will appear now. Under Choose your connection type we recommend using POP/SMTP connection settings (please note that the instructions in this article may differ if using a different connection type)
- Incoming (POP) server will usually be your mail subdomain (e.g. if your domain is example.com it may be mail.example.com)
- Incoming server port should be 995
- We recommend un-ticking the box for Leave a copy of messages on the server unless you have other devices connected to and using this email address
- Under the Authentication section set Authentication to Basic and Encryption to SSL
- If you want to be able to send email as your WilkinsIT email through the Outlook.com website then select Send email using your provider’s server
- If you selected the option to send as the WilkinsIT email, then Outgoing (SMTP) server may be your mail subdomain (e.g. if your domain is example.com it may be mail.example.com)
- Outgoing server port should be 465
- Click OK to save the settings
- You should now see the account you configured under the Manage your connected accounts section
- You can change the Set default from address to your WilkinsIT email if you prefer (assuming you set the sending option up above)
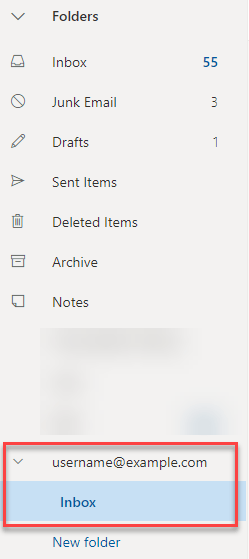
In your inbox (depending on the options you configured) you may see a new section in your folder list for your WilkinsIT email account with it’s sub-folders

Connect Outlook.com – Step 1

Connect Outlook.com – Step 2

Connect Outlook.com – Step 3

Connect Outlook.com – Step 4

Connect Outlook.com – Step 5

Connect Outlook.com – Step 6

Connect Outlook.com – Step 7
Connect Outlook.com – Step 8
Did we miss something?
or do you want to suggest an article?
