If your organization uses Datto Workplace then you’re likely using the Projects functionality to share and synchronize files across multiple users / devices. This article goes over how to manage projects in the organization. You will need to be assigned the proper permissions in order to complete some of these steps – if you’re not sure contact an administrator for your organization.
Creating a new Project
These steps will enable you to create a new project that can then be shared amongst others inside the organization.
- Right-click on the Datto Workplace icon in the notification area (usually found near the time on the taskbar) and click on Preferences…
- In the window that appears, click on the Preferences… button
- Click the Folder Sync tab near the top of the window, then click the Sync Project… button near the bottom
- Click Create Project from local folder
- Select a local folder by either typing in the path or clicking the Browse… button and enter a name for the Project. Click Create Project once that’s done
- You should see the new project listed in the Folder Sync tab now that you just created. Click OK to close the Preferences window, then you can close the other Datto Workplace window you had open as well
Anything that exists in this folder you created a project of will now upload and be available through Datto Workplace as a Project, it can also be shared with others if needed.


(click an image to view the gallery)
Sync an existing Project
Follow these steps to sync a project from Datto Workplace to your local computer. Be aware that you’ll need permission to access a project before you can synchronize it to your computer.
- Right-click on the Datto Workplace icon in the notification area (usually found near the time on the taskbar) and click on Preferences…
- In the window that appears, click on the Preferences… button
- Under the Workplace Sync tab click the Sync Project… button found near the bottom of the window
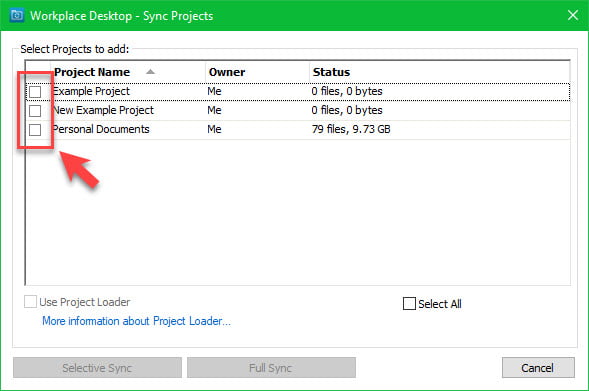
- The Sync Projects window should appear, look for the project you’d like to sync and tick the box beside it’s name, then click either the Full Sync button or the Selective Sync button. If you’d like to automatically synchronize everything in the project then use the Full Sync, if you’d only like to synchronize certain files/folders in the project then use the Selective Sync
- You should see the project you selected under the Synced Projects section now. Click the OK button to confirm and save the changes
The Project you selected will begin to synchronize tot your PC as soon as you click OK. By default it will appear as it’s own folder inside the Datto Workplace folder.


(click an image to view the gallery)
Grant Project access to others using Workplace Online
Follow these steps to grant access (or revoke access) for a project to a specific user or group of users in the organization.
- Right-click on the Datto Workplace icon in the notification area (usually found near the time on the taskbar) and click on Workplace Online…
- A browser window should open to the Workplace Online website, you may have to sign in first. Click on the Projects section near the top
- You should see a list of existing Projects, find the one you want to change the permissions / access on and click on it’s name
- On the specific Project page, find the Team Shares section under it’s name and click on it
- A section should expand that allows you to add users, type in their name to load a list of users and click on the user you want to add. Repeat this process if you wish to add multiple users (if this project is already shared then you should see a list of existing users assigned to this project instead. Look for the field that says Type a name or email… instead if you wish to add to the list)
- After clicking on the user(s) you’d like to add. Set the level of permissions they should have for the Project then click the Share Project button
- After clicking the Share Project button you should see the user(s) listed with the assigned permissions. They should be able to access the project immediately through their account
When adding new users to a project they should receive a notification email to let them know, but you may want to make sure they set up syncing for the project(s) if they’re using the desktop applications. Also through the above process you can revoke access to individual users if need be, you can edit their existing permissions or remove them completely from the project – to remove them click the checkbox beside their name and click Remove from Project. If they’re removed from a project they have synchronized to the computer via the desktop app then it will automatically stop synchronizing to their computer as well.


(click an image to view the gallery)
